
MATROX QUADHEAD2GO Q155 (Video Wall Controller)Updated 3 months ago
The Matrox QuadHead2Go is a simple video controller designed to split a single video into 2,3 or 4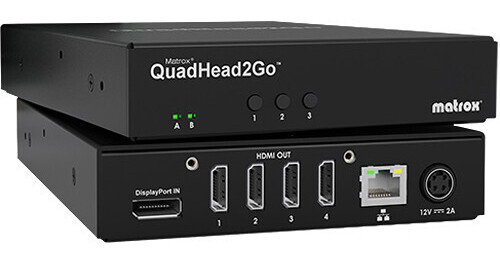 separate images in virtually any configuration, with the ability to add multiple QuadHead2Go units for configurations of any size. The Matrox box outputs four Full HD displays from a single video signal - of up to 4Kp60 and 8Kx8K - at full RGB 8:8:8 and YUV 4:4:4 color support. Each output can have its own resolution, be independently rotated (90, 180, and 270 degrees), cropped, upscaled, downscaled, and positioned anywhere.
A single HDMI input delivers the source signal to the unit. The divided signal comes out of the unit as 2,3 or 4 individual HDMI signals. These HDMI outputs can then be delivered directly to your projection device or converted to HD SDI or CAT-5 or CAT-6 signals for long runs.
GENERAL PLANNING AND SETUP
Video signals degrade over long cable distances and we do not advise HDMI runs of over 30 feet (300 feet if you are using optical HDMI cable). For this reason carefully planning your video installation is key to success. Here are a few helpful tips to keep in mind as you plan your production.
- Include signal boosters wherever you have concerns about signal strength. We have found Decimators to be extremely helpful and versatile as signal boosters and signal converters.
- Consider a rear projection set-up. In many cases it is possible to develop a rear projection plan that relies entirely on HDMI runs of less than 30 feet .
- Work to keep your connection points to a minimum. For many multi-panel projections you will end up with equipment and screens spread out across the entire hall. Troubleshooting signal issues can become time consuming and tiring. Finding a balance between ample signal boosting and limiting the number of connection points is important to ensure success and develop a manageable technology plan.
- When in doubt, boost the signal. The number one issue faced when installing a multi-panel projection is poor signal strength. If one or all of your screens fail there can be a few causes (see below), but adding a signal booster in the line can resolve lots of problems.
- Install early and permanently. If possible, install your projection well in advance of dress rehearsal. This will give time for troubleshooting and sourcing extra equipment if necessary. It is advisable to leave your installation in place through the run of your show. Once you have it up and working you will greatly reduce potential problems on the show date if you do not need to re-install the projection on the day of.
MUSÉIK AND THE QUAD HEAD
If possible, place your Muséik installation on stage with the rest of the ensemble as you normally would. The video signal will come out of the computer as either HDMI or Thunderbolt. Run this video signal directly to the HDMI input on the Matrox box (signal conversion or boosting may be necessary). Remember that Muséik treats audio and video signals as separate components; there will be no audio sent to the HDMI video output.
In order to format the multi-panel video correctly the Muséik Show File will appear distorted if displayed on a single screen or monitor. The multi-panel versions of a Show File cannot be presented in public performance on a single screen. If you do not receive the single screen version of the Show File(s) as part of your download please let us know. It is always recommended to have the single screen version on hand, installed and loaded as a back-up in the event your multi-panel projection fails.
Muséik will allow you to synchronize the multi-panel projection the same way you would any other Show File.
INSTALLATION
- Place your equipment and make all cabling connections. Take care when connecting to the HDMI outputs on the Matrox box. Each output is labelled 1-4 with 1 being the far left signal and 4 being the far right.
- Turn on all projectors, screens, signal boosters, and the Matrox box. Do not press any buttons on the Matrox box; it will ship with all settings pre-configured.
- Open Muséik and load the files.
- Press play on the first file. You may need to press the ESC key on the keyboard to toggle the video to full screen mode.
- Check your screens for proper signals and formats.
TESTING
If you do not get the projection results you expected there are a few simple tests you can run to help identify the problem. We recommend running these tests in the order given below:
- Verify that all equipment is on and receiving/sending signal. Start at the Muséik installation and work down the pipeline. If possible it is recommended to have a small HDMI monitor on hand to perform this testing. Plug the monitor in at each connection point in the signal path to verify.
- Check the video output settings on the Muséik computer. In your display settings the Matrox box will appear as one display. Be sure it is set to 1920 x 1080 @ 60Hz.
MATROX QUADHEAD2GO CONTROLS AND SUPPORT
You should not need to use any of the buttons on the Matrox box. It should arrive fully set up and ready for your production. But if you do need to adjust settings here are some guidelines.
- The "1" button changes the video source. This should be set to "video input," but can be changed to a number of built-in test images.
- The "2" button on the face of the unit changes the display configuration. Press once to pull up the menu and press again to change the config. For a three screen performance, it should be set to 3x1 Landscape.
- The "3" button displays device information and settings.
- The QuadHead2Go manual can be downloaded from Matrox here.
STILL NEED HELP?
If you have an issue that this guide hasn't helped you to fix, please call us at 612-999-1119. You may also need to contact Matrox support, whose contact info is available on their website.